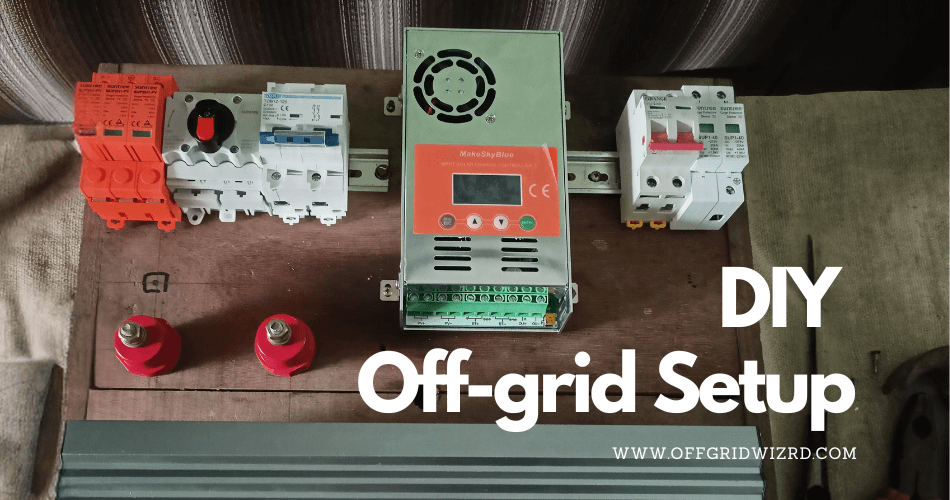
Today, many people are trying to build DIY Off-grid solar systems. But sometimes, they are on a tight budget. So, let’s discuss how I set up an off-grid solar system properly with the correct equipment but on a low budget, and trust me, you’re going to love it.
After extensive research on what parts to buy on AliExpress, I’ve found some reliable and affordable components that work well. I own most of these components to run my off-grid home, and I’ll share my findings with you.
All these products are available for most systems (120V/240V – 12V/24V/36V/48V).
This system is insanely powerful for the price and can handle between 1,000 and 2,000 watts of solar panel power. It features MPPT Charge Controller, a pure sine wave inverter, and overall, it’s just amazing. Every step of the process, from charging to discharging, is super-efficient.
Table of Contents
System Specifications
This is a system with a separate Charge controller & Inverter. So it comes with the possibility to extend as you go on.
- System output Voltage – 230 or 110 V AC
- System Input/ battery Voltage – 24V DC
- Maximum Power out – 3 kW (can be adjusted as per the requirement)
- Solar Panel Input – 1kW (can be adjusted up to 1440W as per the requirement)
- Battery backup – 3.6kWh (can be extended)
Why Choose a 24-Volt System?
One of the main reasons I chose a 24-volt system is its ability to handle a larger amount of power without a significant increase in cost. Imagine this: for the same price as a 12-volt system that handles 800 watts of solar power, this 24-volt system can handle up to 2,000 watts. That’s a huge difference! The beauty of this system is that it’s both simple and powerful, making it perfect for any DIY enthusiast.
Key Components and Their Roles
Let’s dive into the key components of this system. First, we have the MPPT Charge Controller.
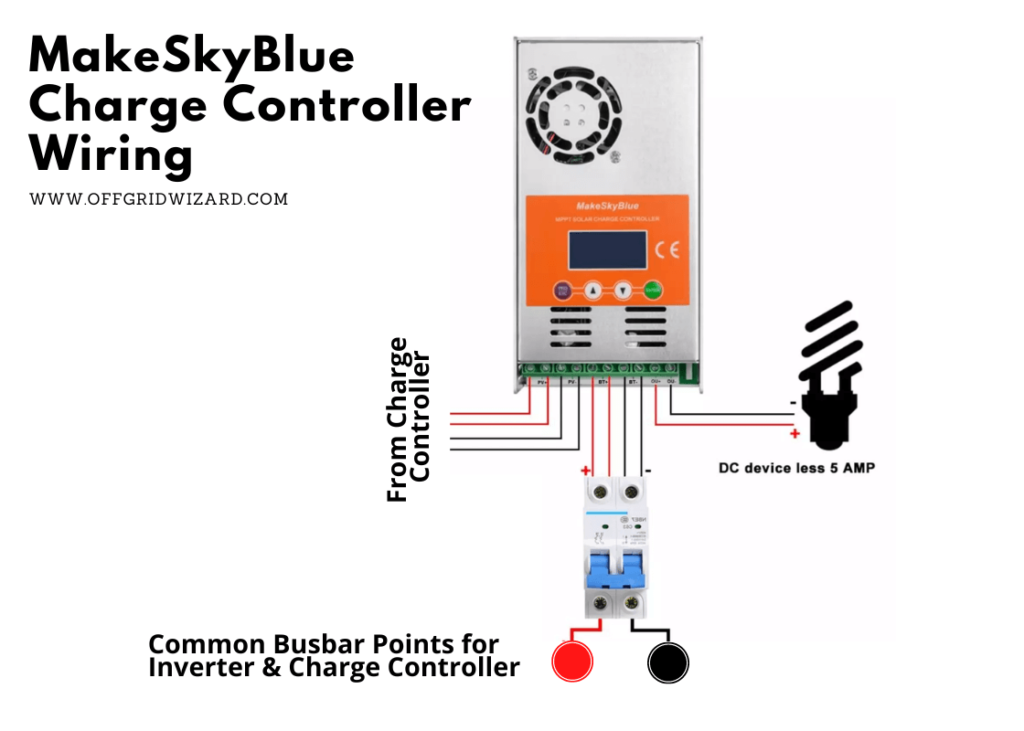
MPPT Charge Controller
The MakeSkyBlue charge controller is a top-quality MPPT charge controller available on AliExpress. I’ve generated more than 1MWh in my off-grid setup using this controller. It’s a fantastic choice for those looking to maximize their solar energy efficiency without breaking the bank.
One of the standout features of the MakeSkyBlue MPPT charge controller is its comprehensive protection functions. It offers,
- Over-voltage protection to prevent damage from excessive input voltage
- Over-temperature protection to avoid overheating
- Output limited current protection to safeguard your batteries and other components.
These protections ensure that your system operates smoothly and safely under various conditions.
With a maximum efficiency of over 98.2% and PV utilization of over 99%, this controller is incredibly efficient, making the most out of your solar panels. Its self-consumption is minimal at just 1.2W, meaning it uses very little power to operate.
The charge controller supports a wide range of battery types, including sealed lead acid, vented, and gel batteries. This versatility allows you to choose the best battery type for your needs and budget. Supporting different battery types means you can opt for more affordable batteries or upgrade to more advanced ones as your budget allows. This flexibility is a significant advantage for DIY enthusiasts looking to build a robust and adaptable off-grid system.
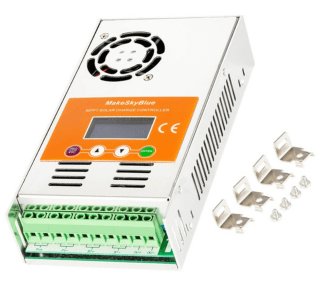
MakeSkyBlue MPPT Charge Controller
- Input – Auto detect 12, 24 & 48V
- Current Rating – 60A
- Max PV Power(24V) – 1440W
Pure Sin Wave Inverter
Next, the pure sine wave inverter is crucial. This inverter ensures that the power you generate is smooth and safe for your appliances. It’s also comes with low voltage cutoff protection, allowing you to set the charge and discharge cycle to suit your needs. For instance, if you have 12-volt appliances, you can easily connect them using a converter
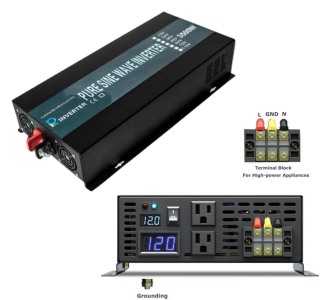
Pure SinWave Inverter
- Output Power – 2000 – 3000W
- Input Voltage 24V DC
- Output Voltage – 110/220V AC
Batteries
Then, we have the batteries. I used Solar Tubular batteries as they offer an in-between performance and cost. If you have more budget, you can go for lithium iron phosphate batteries because they are incredibly stable and long-lasting. Lithium batteries are rated for 10 years, but with proper use, they can last 20 years or more. That’s the kind of reliability you want for an off-grid solar system. But you can use any kind of battery including Lead acid, solar tubular, AGM.
For batteries, it’s better to purchase locally due to shipping constraints and costs. The Makeskyblue charge controller supports various battery types, including lead acid, AGM, and lithium. Depending on your budget and requirements, you can choose the appropriate type. If you prefer online shopping, here’s a good option from Amazon:
Renogy Deep Cycle AGM 12 Volt 100Ah Battery: Link
Solar Panels
The power capacity of your panels should match your system’s requirements. For a 24V system, the maximum nominal PV power supported by the charge controller is 1440W. Therefore, selecting panels that total up to this capacity or slightly below will ensure that you make the most out of your solar setup without overloading the system.
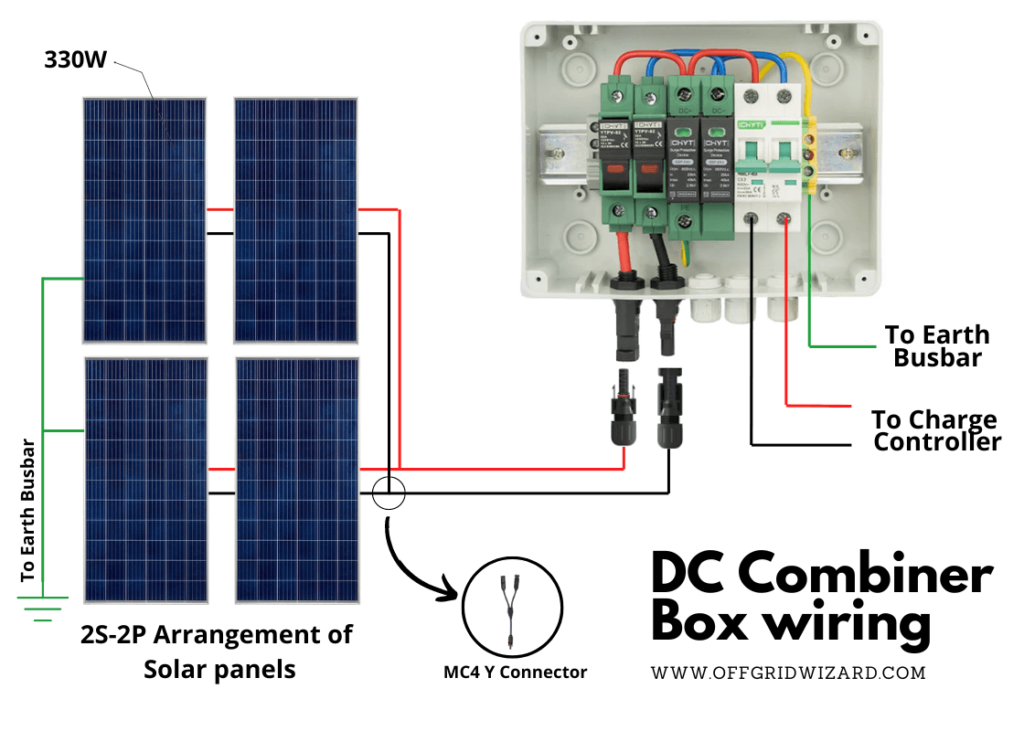
For example, if you decide on 360W panels, you would need four of them connected in 2S-2P arrangement to reach 1440W (360W x 4). This setup ensures that your panels and MPPT controller work harmoniously, providing optimal energy conversion and storage.
Same like for the batteries, we recommend you to local purchase solar panels. Because I couldn`t find a reliable solution from AliExpress.
Protecting Your Investment
Protection is vital for any solar system. I’ve included a battery protect device with short circuit protection to safeguard the inverter. This system is designed to work seamlessly with all components, minimizing the risk of damage. You’ll also find circuit breakers and a fuse to handle any potential overcurrent issues, ensuring the safety and longevity of your setup.
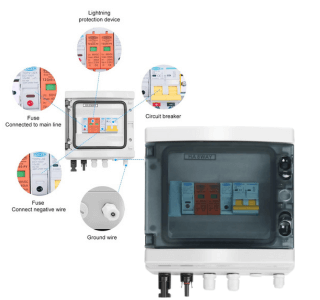
Solar PV combiner Box with DC SPD
- Built-in fuses
- Built-in DC SPD for Solar String
- Built-in Isolater for solar String
Surge Protection Devices (SPD)
SPDs are not essential for the operation of your off-grid solar system. But if you are living in an area with high risk of lightning, we recommend you to install DC & AC SPDs. Here are the specifications that you should follow when purchasing those devices.
DC SPD Specifications for the Solar String:
- Protection Class: Type 2 (Class II)
- Maximum Continuous Operating Voltage (Uc): 200V DC
- Nominal Discharge Current (In): 20kA (8/20μs)
- Maximum Discharge Current (Imax): 40kA (8/20μs)
- Voltage Protection Level (Up): ≤600V
- Mounting: DIN rail
Here, we are using a pre-build DC combiner box with a DC Breaker, fuse, and DC SPDs from AliExpress. But if possible, you can locally purchase better efficient SPDs from premium brands like Schneider or Phenix.
AC SPD Specifications for 230V or 110V Household Voltage:
- Protection Class: Type 2 (Class II)
- Nominal Voltage (Un): 230V AC / 110V AC
- Maximum Continuous Operating Voltage (Uc): 275V AC (for 230V systems) / 150V AC (for 110V systems)
- Nominal Discharge Current (In): 20kA (8/20μs)
- Maximum Discharge Current (Imax): 40kA (8/20μs)
- Voltage Protection Level (Up): ≤1.5kV
DC Fuse Specifications for Battery Bank:
When selecting a DC fuse for your battery bank, ensure it matches your system’s voltage and current requirements to provide effective protection against overcurrent and short-circuit conditions.
- Rated Voltage: 32V DC, 48V DC, 80V DC, or 100V DC (depending on the battery system voltage)
- Rated Current (In): Typically ranges from 50A to 400A (choose based on your battery bank’s current requirements)
- Breaking Capacity: 20kA DC at rated voltage
- Fuse Type: NH (knife blade), ANL, or Class T
- Response Characteristic: Fast-acting (for protection against short circuits) or time-delay (for protection against overcurrent conditions)
- Mounting: Bolt-on or DIN rail
- Housing Material: High-strength, flame-retardant plastic
Breaker Between the Charge Controller and Battery
- Rated Voltage (Un): 12V DC, 24V DC, 48V DC (depending on system voltage)
- Rated Current (In): Typically, 60A to 100A (match to charge controller output)
- Breaking Capacity: 10kA to 20kA DC at rated voltage
- Type: DC Circuit Breaker, MCB (Miniature Circuit Breaker) or MCCB (Molded Case Circuit Breaker)
- Mounting: DIN rail
- Tripping Curve: Type C or Type D (for high inrush currents)
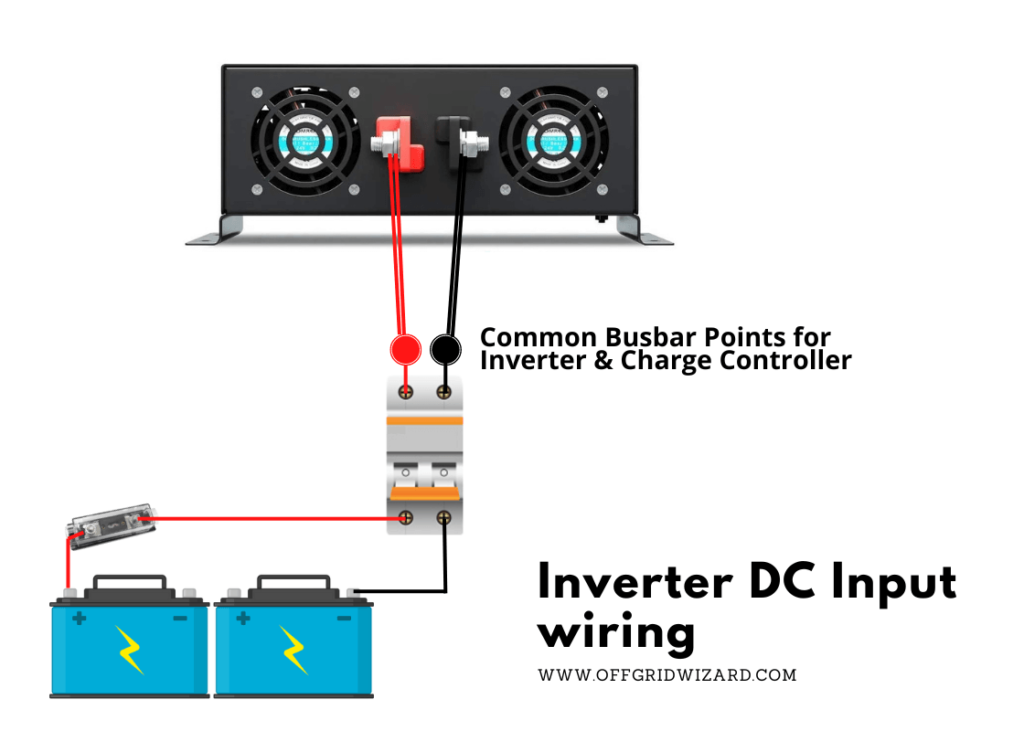
Breaker Between Battery and Inverter
- Rated Voltage (Un): 12V DC, 24V DC, 48V DC (depending on system voltage)
- Rated Current (In): Typically 100A to 250A (match to inverter input)
- Breaking Capacity: 10kA to 20kA DC at rated voltage
- Type: DC Circuit Breaker, MCCB (Molded Case Circuit Breaker)
- Mounting: DIN rail or panel mount
- Tripping Curve: Type C or Type D
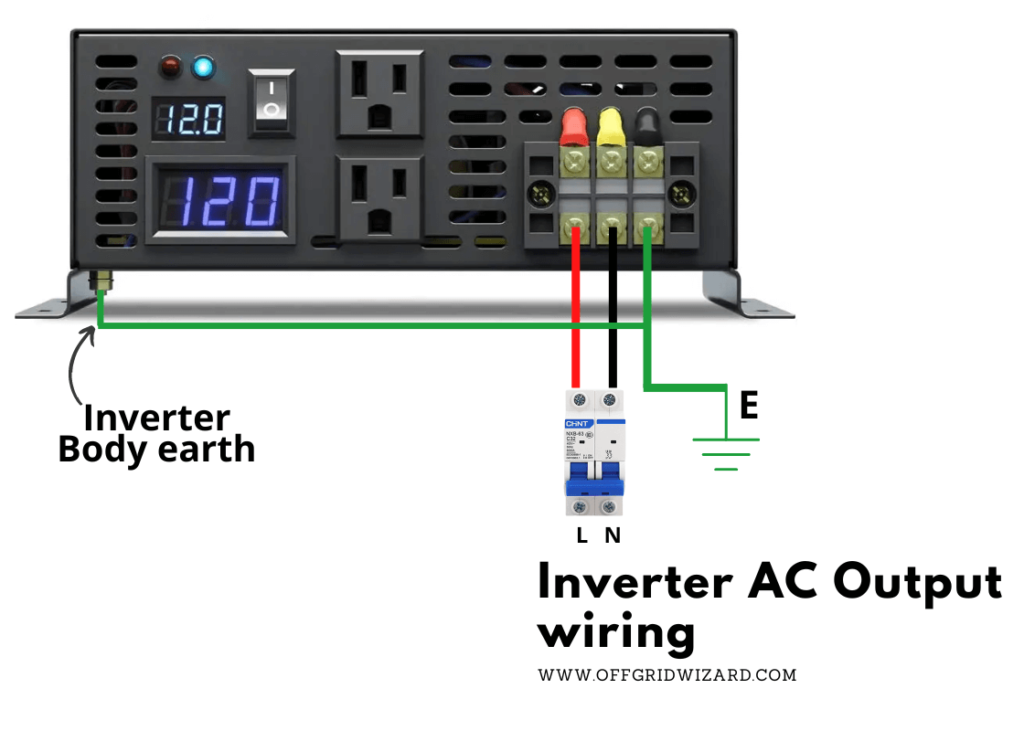
Breaker for Inverter Output (AC)
- Rated Voltage (Un): 230V AC or 110V AC (depending on household voltage)
- Rated Current (In): Typically 16A to 32A (match to inverter output capacity)
- Breaking Capacity: 6kA to 10kA AC at rated voltage
- Type: AC Circuit Breaker, MCB (Miniature Circuit Breaker)
- Mounting: DIN rail
- Tripping Curve: Type B or Type C (for residential circuits)
Building the System
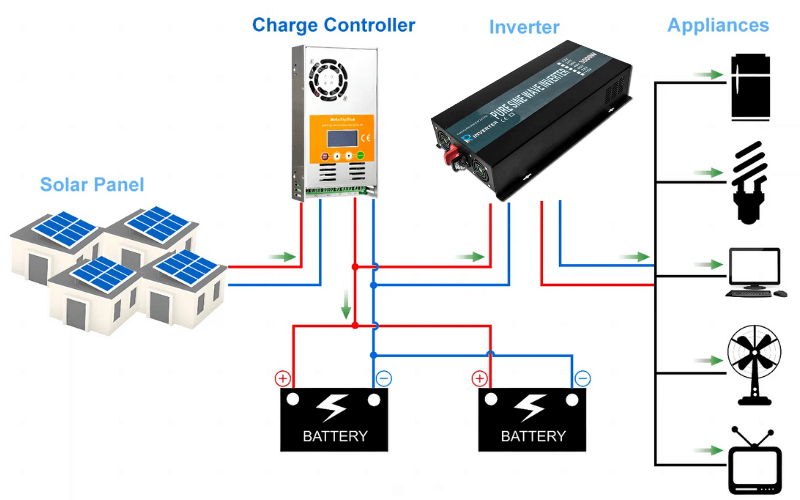
Now, let’s get into the nitty-gritty of building this system. The first step is to arrange your batteries in series to create a 24-volt system. Before connecting two batteries in series, you must connect them in parallel to equalize their voltage. This step is crucial to prevent any damage and ensure efficient operation.
Once the batteries are connected, you’ll set up the solar charge controller. This device regulates the charging of the batteries, making sure they receive the correct amount of power. For your selected battery, you’ll need to adjust the charge profile parameters. These settings optimize the performance and lifespan of your batteries.
DIY Off-Grid Solar Wiring Diagrams PDFWiring and Installation
Wiring the system might seem daunting, but it’s straightforward if you follow a plan. Use high-quality, pure copper wires to ensure efficient power transfer. For a 24-volt system, here we have list out the suitable wire types, but always choose wires that match your specific power requirements.
Battery to Inverter
- Soft drawn Cu Wires
- Cable Size: 25 sqmm to 50 sqmm (depending on current requirements)
- Equivalent AWG: 4 AWG to 0 AWG
- Typical Current: 100A to 200A (adjust based on your inverter’s input current)
Charge Controller to Battery
- Cable Size: 16 sqmm to 25 sqmm
- Equivalent AWG: 6 AWG to 4 AWG
- Typical Current: 60A to 100A (based on your charge controller’s output)
Inverter Output (AC)
- Cable Size: 4 sqmm to 10 sqmm (for 230V AC or 110V AC systems)
- Equivalent AWG: 12 AWG to 8 AWG
- Typical Current: 16A to 32A (based on inverter output capacity)
Solar Panels to Charge Controller
- Double insulated Wires for outdoor Use
- Cable Size: 4 sqmm to 6 sqmm
- Equivalent AWG: 12 AWG to 10 AWG
- Typical Current: 10A to 30A (depending on the combined output of your solar panels)
These cable sizes are recommended to ensure minimal voltage drop and safe operation under typical load conditions. Always use high-quality, appropriately rated cables for outdoor or high-current applications.
Mount the components on a board for easy access and maintenance. Secure the wires with cable clips to keep everything organized. Install circuit breakers and fuses in strategic locations to provide overcurrent protection. This setup not only looks neat but also enhances the system’s safety.
Cost Breakdown for the DIY Off-Grid Solar System
Let’s talk about costs. Quality components are worth the investment for a reliable and long-lasting system. Here’s a quick cost breakdown for my setup:
- 3500-watt, 24-volt inverter: $292
- Solar charge controller: $76
- Busbar Supports, Lugs & Connectors: $30
- DC Combiner Box (including DC MCB & SPD): $41
- Other Breakers & MCBs: $60
- Batteries: $100-200 (Depending on the selected type)
- Cables & wires: $50
MakeSkyBlue MPPT Charge Controller
Solar PV combiner Box with DC SPD
Pure SinWave Inverter
While the initial investment might seem steep, the long-term benefits of having a robust and efficient off-grid solar system far outweigh the costs. Plus, the satisfaction of building it yourself is priceless!
Final Thoughts
Building a DIY off-grid solar system is an exciting and empowering project. With the right components and careful planning, you can create a system that provides reliable, sustainable energy for years to come. Whether you’re looking to power a small cabin, an RV, or even your home, this 24-volt system is up to the task.
Remember, every component plays a vital role in the system’s overall performance. From the batteries and inverter to the solar charge controller and wiring, each piece must be chosen and installed with care. And with a little patience and attention to detail, you’ll be basking in the glow of your own solar-powered success in no time.
While AliExpress is great for budget-friendly solar gear, many prefer Amazon for faster delivery, easier returns, and wider brand options. If you’d like to explore a complete DIY Off-Grid Solar Setup with Amazon Products, check out our detailed guide
So, get out there, gather your materials, and start building your very own DIY off-grid solar system. The journey to energy independence starts now, and I’m excited for you to experience the incredible benefits of harnessing the power of the sun. Happy building!