Welcome back to the final part of our Solar Off-grid journey! In the last two parts, we dived into the basics and explored how to size your system and how to pick the best components. Now, it’s time to roll up your sleeves and get your hands dirty with the actual Off-grid Solar installation.
Table of Contents
Solar Panel Installation
Now, you have already sized your solar power system and decided on the required Solar Panels. So, the next step is to install them properly.
Where to Locate the Solar Panels?
Finding the perfect spot for your solar panels is crucial. Think of it like sunbathing. You won’t get a tan if you’re in the shade, right? Similarly, your solar panels need maximum sunlight.
So, make sure the spot you pick is sturdy and receives ample sunlight throughout the day.
How do you determine the direction and angle of the solar panels?
This might sound a little technical, but hang in there! Solar panels love the sun, and they’re at their best when facing it directly.
If you’re in the northern hemisphere, you’ll want your panels facing due south. And if you’re in the southern hemisphere? You guessed it, face them north. Now, about the angle. It’s generally best to tilt them at the same angle as your location’s latitude.
But if you’re a bit adventurous, adjusting them a tad – 15 degrees up or down – depending on the season, could give you better results! Read our detailed guide on deciding the optimum solar panel orientation.
How to Mount Solar Panels?
Solar panel mounting methods can differ depending on the panel type and the place you are going to mount them.
Types of Mounts:
- Fixed Mounts: These are stationary mounts and non-adjustable. Good for places with consistent sun year-round.
- Tracking Mounts: They can be moved and adjusted to follow the sun’s path. More efficient but also more expensive.
- Ground Mounts: These are Ideal if you’ve got a lot of yard space and are not keen on roof installation.
Required Tools & Materials:
- Solar Panels
- Mounting system (racking)
- Bolts and brackets
- A drill
- A level
- A ladder
- Safety gear – don’t skimp on this!
The most used solar panel type is glassed panels. So, let`s talk about them first.
Steps to Mounting:
- Safety First! Always wear safety gear when you are working at height. Think of harnesses, gloves, and protective eyewear.
- Positioning: Determine the best position for your panels.
- Attach Mounts: Secure the mounting brackets to the rafters. To find the rafters, you might need a stud finder. Ensure they’re aligned straight using a level.
- Install Rails: Attach the rails to the mounting brackets. This is where the panels will sit.
- Secure Panels: Place the panels on the rails and secure them using the provided hardware. Ensure they’re tightly fastened.
- Connect Wiring: Finally, run the wiring. This will usually go to a charge controller that changes the solar energy to usable electricity.
The thin-film solar panels also have become popular among many solar enthusiasts due to their sleek design and versatility. They are lighter and more flexible than traditional solar panels. However, their installation process is a bit different but easy.
- Inspect the Surface: Whether it’s a rooftop, façade, or any other structure, ensure its sturdy and can handle the weight and adhesion.
- Clean the Surface: Remove any debris or dust that might affect the adhesion of the panels.
- Paste & Wire: Thin-film panels come with a sticky back. You can attach them directly to the surface, much like a sticker.
Solar Panel Cooling
Panels love the sun but not too much heat. When they get too hot (around 100°F), they become less efficient. The trick? Keep some space behind them to allow air to circulate. This helps in cooling them down and ensures the highest efficiency.
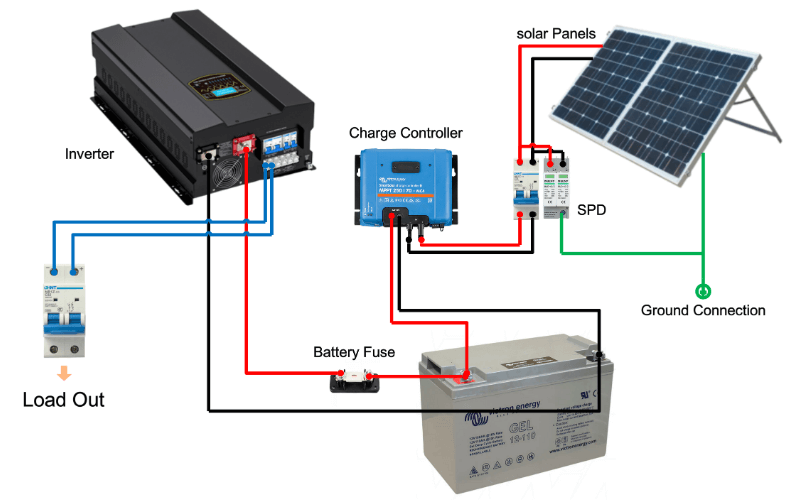
Solar panels, Inverter & Battery Backup Wiring
Here’s where things get a tad more technical in off-grid solar Installation. Let’s dive in.
- Remember, electrical works can be tricky; consider getting expert help if you are not very confident!
Step 1: Safety First!
Before you begin the wiring, make sure you have disconnected all the live connections. Additionally, ensure the solar panels are covered or shaded. So, they aren’t actively generating electricity while you’re working.
Step 2: Decide on the Panel Configuration
Depending on your needs and the number of panels you have, you can wire your solar panels in:
- Series: Connects the positive terminal of one panel to the negative terminal of the next. This increases the voltage but keeps the current the same.
- Parallel: Connects all positive terminals together and all negative terminals together. This increases the current but keeps the voltage the same.
- Combination: A mix of series and parallel connections to get a specific voltage and current.
Step 3: Using MC4 Connectors to Connect Solar Panels
Solar panels typically come with MC4 connectors, which make it easier to connect panels together.
If wiring in series, plug the male MC4 connector of one panel to the female MC4 connector of the next panel. For a parallel connection, you’ll need an MC4 parallel connector, which is commonly known as a “branch connector” or “Y connector”.
Step 4: Connect to the Solar Combiner Box (Optional)
If you have multiple panels or strings, it’s a good idea to connect them to a combiner box. This box combines multiple panel inputs into a single output that goes to the inverter. Here’s how:
Connect each panel’s wires to separate breakers/fuses inside the combiner box. Then, the combiner box will have one positive and one negative output. These will connect to your inverter.
Step 5: Run the Wires to the Power Center
Using the appropriate gauge wire (as determined earlier), run the positive wire (usually red or marked with a ‘+’) from the solar panels or combiner box to the ‘PV+’ or similar labeled input on the inverter or charge controller. Then, run the negative wire (usually black or marked with a ‘-‘) to the ‘PV-‘ or similarly labeled input.
Step 6: Connect the Charge Controller to the Batteries:
- Positive Terminal: Connect the positive wire from the charge controller (often marked ‘Battery’ or ‘Bat+’) to the positive terminal of your battery bank.
- Negative Terminal: Similarly, connect the negative wire from the charge controller (marked ‘Battery’ or ‘Bat-‘) to the negative terminal of your battery bank.
It’s a good practice to install a suitable DC fuse or circuit breaker between the battery bank and the inverter. This protects the system from potential overcurrent situations.
Step 7: Connect the Batteries to the Inverter:
First things first, we should check whether our battery voltage matches the inverter input voltage. The battery configuration you are going to use should match your inverter’s input voltage and energy storage needs.
- Series: Increases voltage. Connect the positive terminal of the first battery to the negative terminal of the next, and so on.
- Parallel: Increases capacity (ampere-hours). Connect all positive terminals together and all negative terminals together.
After that, we can make the Battery Connections to ready the battery bank. If you have bought an already fixed battery bank, you can neglect this step.
Series Configuration:
- Connect the positive terminal of the first battery to the negative terminal of the second battery using a battery cable.
- Continue this pattern until the last battery in the series.
- The free positive terminal on the first battery is the overall positive output, and the free negative terminal on the last battery is the overall negative output.
Parallel Configuration:
- Connect all positive terminals together using battery cables.
- Likewise, connect all negative terminals together.
Connect to the Inverter:
- Positive Terminal: Connect the overall positive output (from your battery or battery bank) to the positive terminal of the inverter, usually marked ‘Battery+’ or ‘Bat+’.
- Negative Terminal: Connect the overall negative output to the inverter’s negative terminal, generally labeled ‘Battery-‘ or ‘Bat-‘.
Step 8: System Grounding
For safety reasons, it’s vital to ground both your solar panels and inverter. Connect a grounding wire from the solar panel frames and the inverter to a grounding rod buried in the ground. Also, if you have multiple ground rods in your home Electrical Installation, connect each together to make it a combined earth connection.
It is recommended to keep the earth resistance below 2 Ohms and is necessary to keep it below 10 Ohms. Refer code of Electrical Installations of your country for the exact value for your place.
Step 9: Double-Check & Power On
Before powering up, double-check your connections to ensure there are no loose wires. Gradually uncover the panels or remove shading to let them generate electricity. Monitor the inverter’s display or indicator lights to confirm it’s working correctly.
System Commissioning
Off-grid Solar System Installation is a blend of labor and technical know-how. So remember, if things get too tricky at any point, there’s no shame in calling in a professional. After all, it’s a long-term investment in clean energy! Enjoy your sun-powered home!