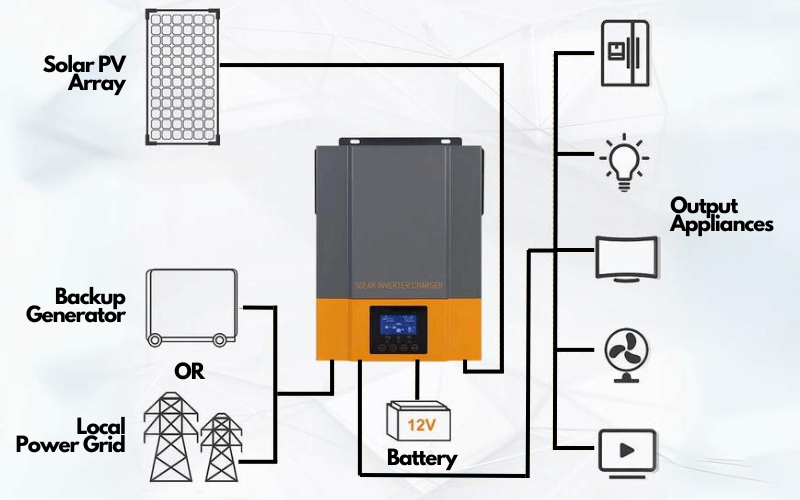
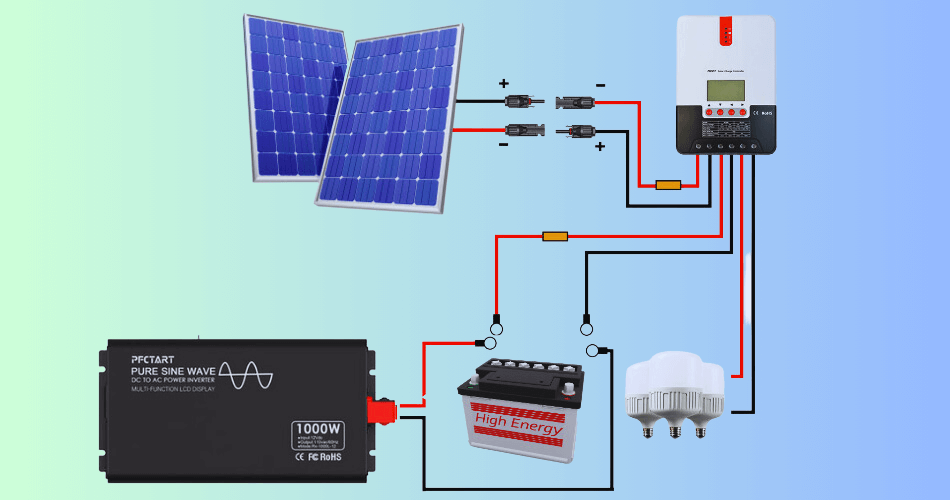
Sizing your own DIY Off-grid Solar system can be like putting together a jigsaw puzzle. Every component needs to be compatible with each other to ensure you have non-interrupted power day and night.
Table of Contents
Power Calculation for the Off-grid Solar System
At first, you have to decide how big or small your system would be based on your needs!
How to measure your power requirement?
Alright, think about all the electrical devices and appliances you use daily. Your computer, fridge, lights, fans—the list goes on. By figuring out how much power each device uses and adding it all up, you’ll get a sense of how big your solar setup needs to be.
As an example, assume you have below electrical appliances that are used in the mentioned time periods per day,
| Device | Wattage | Operating Time |
|---|---|---|
| Light | 20W | 5 hours |
| Fan | 150W | 3 hours |
| Fridge | 200W | 24 hours |
Let`s consider 12 hours of actual running time for the fridge due to on-off operation. With the above details, you can calculate the daily energy requirement for your home.
Total Energy demand for the light = 20W * 5 h = 100Wh.
Likewise, calculate the demand for the rest of the devices.
| Device | Wattage | Operating Time | Total Energy Used |
|---|---|---|---|
| Light | 20W | 5 hours | 100Wh |
| Fan | 150W | 3 hours | 450Wh |
| Fridge | 200W | 24 hours | 2400Wh |
Then the total required energy demand for the day is (100 + 450 + 2400 )2950 Wh = 3kWh
Now you have decided your energy needs. Use our built-in Off-grid solar system calculator to simply calculate your energy demand for a day.
Selecting the Solar Panels
Solar panels are the main devices that catch rays from the sun and turn them into electricity. So, let`s find out what are the different types and how to select the right module for your system.
How much energy does a solar panel produce?
There are different types and sizes of solar panels that can be used based on the application. Some are super-efficient, soaking up sunlight like a sponge, while others are a bit laid back.
| Panel Type | Efficieny |
|---|---|
| Monocrystalline | 15% -22% |
| Polycrystalline | 13% – 16% |
| Thinfilm | 10% – 13% |
However, for each panel, you can find out how much energy will be generated per day by simply multiplying the nominal operating power ( mentioned in the panel label) by the average sun hours per day.
How many Solar panels do you need?
After doing your home power demand calculation, you have a sense of how many of these solar panels you need.
Here, some additional factors come into action: the average sun hours per day and average solar insulation per day. When deciding these factors, you should pay attention to the worst-case scenario.
Because both of these factors can be changed depending on the season. As an example, the average sun hours and solar insulation can be high during the summer season and lower in the winter. So, it’s better to get a balanced value that is more weighted to the winter side.
Otherwise, your system will not be capable of powering up your home in the Winter. Learn more about how to decide the right solar insolation and sun hours per day with our ultimate guide here.
According to the previous example, Let`s assume the average sun hours is 6 and Solar insolation is 1000W/m2.
Then, required Solar Panel Capacity = 3kWh/6h = 500W
Required space for panels = 500W/800Wm-2 = 0.625 m2
Solar Power Center Planning
Up to now, we have designed and sized the panel capacity. Next up, your DIY Off-grid Solar system needs a control centre—a place where all the magic happens!
Charge Controller:
A charge controller is like the guardian of your battery. It ensures that the power coming from your solar panels doesn’t overwhelm your battery or undercharge it. So, how do you pick the right one?
PWM (Pulse Width Modulation) or MPPT (Maximum Power Point Tracking)?
For most off-grid systems, MPPT is the way to go as it’s more efficient. Read More about the pros and cons of MPPT and PWM solar charge controllers.
To size it right, calculate the total wattage of your solar panels and divide it by your battery’s voltage. This gives you the amperage that your controller needs to handle. Always choose a controller that can manage a bit more than your calculation.
Inverter:
Electricity has shapes too! Normally, most of the electrical appliances in our homes need Alternating current (AC). In contrast, solar panels and batteries provide Direct currents (DC).
Inverters transform the direct current (DC) from your panels and batteries into alternating current (AC) that your home appliances use.
First, determine the total wattage of all devices you plan to run simultaneously. Then, buy an inverter that can handle that load.
Pure Sine wave or Modified Sine wave Inverter?
If you are using filament lights or inductive appliances like fans and motors, you will definitely need a pure sine wave inverter. Otherwise, they can be damaged.
LED lights, TVs and similar appliances, which convert AC current to DC when operating, are OK with modified sine wave inverters.
Combined Inverter with Charge Controller for Off-grid Solar Systems
Normally, the charge controller and inverter are two distinct units. The charge controller would regulate the flow of current from the panels to the batteries, while the inverter would then convert the battery’s stored DC power into AC power for your home. Now, imagine having both these functionalities in one sleek unit.
Some of these solar charge controller inverters are grid-tied capable (Hybrid Inverters). They can draw grid energy during periods of low solar output. This feature is great for areas where feed-in tariffs are available.

Remote Monitoring Hub:
Remote monitoring is not an essential thing for the system to perform. But it allows you to keep an eye on your system’s performance from afar. You should ensure the hub is compatible with your other components, especially the charge controller and inverter. Some hubs offer real-time data monitoring, system alerts, and performance history. Decide which features are essential for you.
Determining the Wires
When setting up your solar panel system, ensuring the right wire gauges is absolutely crucial. Too thin wires make a risk of overheating or inefficiencies. Too thick wires are a waste of money. Let’s break this down step by step:
Wire Gauges from Solar Panels to Inverter:
- Current (Amps): Find out the total current output of your solar panels when they’re generating at peak capacity.
- Voltage Drop: Aim for a voltage drop between 1% to 3%. Voltage drop can cause inefficiencies, so it’s essential to choose the right wire gauge.
- Distance: Measure the distance between your solar panels and the inverter. Longer distances typically require thicker wire.
- Calculation: Use the above data in an online “Solar Wire Gauge Calculator” or refer to a wire gauge chart considering the current and distance.
Wire Gauges from Inverter to Batteries:
- Current (Amps): Determine the maximum current the inverter can draw from the batteries.
- Distance: Measure the distance between your inverter and batteries. Typically, this distance is relatively short.
- Voltage Drop: For this section, aim for a voltage drop of less than 2% due to the high currents.
- Calculation: Using the data above, refer to a wire gauge chart or an online calculator to determine the wire gauge.
Circuit Breakers:
These are safety devices that protect your system from electrical mishaps. There are several factors to be considered when selecting a circuit breaker.
Amp Rating: Based on your system’s max current, choose circuit breakers that can handle just above that amount. This ensures they trip if anything unusual happens.
Type: There are separate types of breakers to handle DC and AC currents. You should never use AC breakers or isolators for DC use. It can heat and cause fires due to current sparks.
Placement: You’ll need breakers between your panels, charge controller, battery, and inverter.
Surge protection Devices:
Mother Nature can sometimes throw curveballs like lightning. SPDs protect your expensive equipment from sudden voltage spikes often caused by lightning. There are certain factors to be considered when selecting an SPD.
Joules Rating: The higher this rating, the more energy the protector can absorb. Consider your location (some areas have more lightning) and your system size.
Response Time: Opt for devices with a quick response time. The faster, the better!
Change Over:
Sometimes, you might want to switch between solar power and another source. This gadget helps with the swap if needed.
Capacity: Determine the total load of your household and ensure the changeover can handle it.
Type: Manual changeovers are cheaper but require you to switch physically. Automatic ones seamlessly change the power source when one goes out.
Determining the Battery Backup
How to size your battery backup?
Batteries are like water tanks for electricity. How much “water” (or power) you need depends on how long you want the lights to stay on when the sun isn’t shining.
Which battery type is right for your system?
There are different types of batteries with different characteristics. Some batteries are long-lasting; others pack a punch for a shorter time. It’s all about balancing the cost vs. efficiency and life span of the battery.
Battery Management Systems (BMS):
Your batteries are like the heart of your DIY Off-grid Solar system. BMS keeps your batteries in check, ensuring they’re charged correctly and aren’t overworked.
Your BMS should be compatible with the inverter and batteries you’re using. There are some multifunctional BMSs in the market that can balance cells, provide temperature readings, and give detailed battery health diagnostics.
Final Words
Understanding and sizing these components properly ensures your DIY Off-grid Solar system runs smoothly and safely. When in doubt, always opt for a bit of overcapacity to account for future expansions or unexpected loads.
Check our updated Solar Off-grid system Calculator to size your system properly. Happy solar adventuring!
